Thursday, November 14, 2019

SAN Cisco: Important FC zoning and Cisco SAN Switch helpful commands and concepts with examples

I am a seasonal IT professional with a background on VMware, Storage, Backup, Unix, and Project liaison experience. I have held positions working on technologies like Netapp, EMC, IBM, Cohesity storage and Backup supporting SAN and NAS Environment. I have held roles of IT administrator, engineer, team lead and project liaison. This blog is for Storage and Backup Professionals, and content are derived from vendor as well as my own experience.
............................................................................................................................................................................Helpful display/Show commands on Cisco SAN Platform.


show zone
Displays zone information for all VSANs.

show zone vsan 1
Displays zone information for a specific VSAN.

show zoneset vsan 1
Displays information for the configured zone set.

show zoneset vsan 2-3
Displays configured zone set information for a range of VSANs.

show zone name Zone1
Displays members of a zone.

show fcalias vsan 1
Displays fcalias configuration.

show zone member pwwn 21:00:00:20:37:9c:48:e5
Displays membership status.

show zone statistics
Displays zone statistics.

show zone statistics read-only-zoning
Displays read-only zoning statistics.

show zoneset active
Displays active zone sets.

show zoneset brief
Displays brief descriptions of zone sets.

show zone active
Displays active zones.

show zone status
Displays zone status.

show zone
Displays zone statistics.

show running

Displays the interface-based zones.

Here is a depiction of SAN Zoning.


https://www.cisco.com/c/dam/en/us/td/i/000001-100000/75001-80000/79001-80000/79537.ps/_jcr_content/renditions/79537.jpg


##How to delete device-alias name from current zone/zoneset
#config t
#dev data
#no dev-alias name hostname_portA
#dev-alias commit
#exit

##How to confirm if specific wwpn is currently logged in to fabric
#show flogi | include xx:xx:xx:xx

## How to list all fabric logins on switch
#show flogi database


##Show all configuration
#show running-conifg

##Reboot individual Port
#config t
#int fc3/1
#shut
#noshut
#int fc3/1
#show int fc3/1

##Display all port details
#show interface brief

You are Welcome :)
Source: www.cisco.com

SAN Cisco: Fiber Channel Zoning on Cisco MDS Switches with examples


I am a seasonal IT professional with a background on VMware, Storage, Backup, Unix, and Project liaison experience. I have held positions working on technologies like Netapp, EMC, IBM, Cohesity storage and Backup supporting SAN and NAS Environment. I have held roles of IT administrator, engineer, team lead and project liaison. This blog is for Storage and Backup Professionals, and content are derived from vendor as well as my own experience.
............................................................................................................................................................................Configure SAN FC zoning in Cisco MDS SAN Switches

Every changes requires configuration mode.

Step 1:

Log into SAN Switch by ssh’ing.
switch# config t
Enters configuration mode.

Step 2:

Create a Zone in a vsan with vsan-id specified
switch(config)# zone name Zone1 vsan 3
switch(config-zone)#
switch(config-zone)# member pwwn 10:00:00:23:45:67:89:ab (Member pwwn, if pwwn is used)
switch(config-zone)# member fwwn 10:01:10:01:10:ab:cd:ef (Member wwn, if wwn is used)
switch(config-zone)# member fcid 0xce00d1 (Member fcid, if fcid is used)

Step 2a. However for management simplicity, it is efficient, creating device-alias or fc-alias is helpful.

Switch#config t
Switch (config)# device-alias database
Switch (Config-dev-alias-database)# device-alias name hostA_portA pwwn 10:00:00:23:45:67:89:ab
Switch (Config-dev-alias-database)# device-alias name stroageA_portA pwwn 10:00:00:23:45:65:89:yy
Switch (Config-dev-alias-database)#dev commit
Switch(Config)# exit

Step 2b. Now add newly created device_alias into zone.

switch(config)# zone name Zone2 vsan 3
switch(config-zone)# member dev-alias hostA_portA
switch(config-zone)# member dev-alias storageA_portA
switch(config-zone)# exit

Step 3: Create Zoneset (if not present) in specific VSAN. IN this example we assume zoneset is  present.

switch# config t
switch(config)# zoneset name Zoneset2 vsan 3
switch(config-zoneset)#
switch(config-zoneset)# member Zone2
switch(config-zoneset)# exit

Step 4: Activate Zoneset to make newly added members active and be able to communicate.

switch# config t
switch(config)# zoneset activate name Zoneset2 vsan 3

Step 5: Save changes made.

switch(config)# copy running-config startup-config

<< If you want to disable entire zoneset, follow below. But Be careful, it will deactivate all exising members that may already in production and is working>>
switch(config)# no zoneset activate name Zoneset1 vsan 3


Few Helpful Display Function within SAN Switch can be found at other blog link here:

https://www.blogger.com/blogger.g?blogID=3972111459361070478#editor/target=post;postID=6438659679711440104;onPublishedMenu=allposts;onClosedMenu=allposts;postNum=0;src=postname


You are Welcome :)
Source: www.cisco.com
Wednesday, November 13, 2019

Netapp: Example of CN1610 Netapp Cluster switch FASTPATH and RCF upgrade

Learn Storage, Backup, Virtualization,  and Cloud. AWS, GCP & AZURE.
............................................................................................................................................................................Upgrade FASTPATH and RCF on CN1610


Important things to consider:

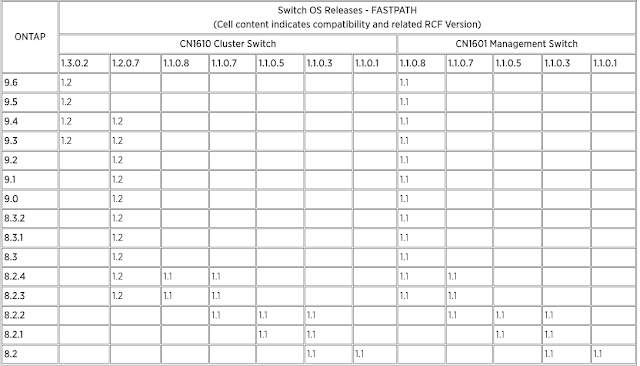
  • Before a Netapp Cluster switch is upgraded, ensure that current running Ontap supports the FASTPATH version to be upgraded on switch side by looking into interoperability matrix.

  • Ensure FASTPATH version and RCF version are compatible with ONTAP version running.


***Once verified that the RCF and FASTPATH are compatible, proceed with below**


Steps:

1. Verify Cluster ports are home, healthy and operational.


2. Verify Cluster interface are healthy, and are home


3. We are doing Cluster Switch 2 Upgrade first. So migrate cluster Lif xx_clus2 over to partner port on same local node.


4.  Verify cluster lif clus2 has migrated to NODE 1, port e0a.


5. Now Modify Cluster Port by turning its admin status which was connected to ClusterSwitch#2. By Step no. 3, we now have no dependency of cluster lif on port e0b on either nodes.


6.  Confirm Cluster port admin/link status is down as a result of Step #5.


7. Now Shutdown the ISL port on ClustwerSwitch#1 to remove any ISL traffic to ClusterSwitch#2.


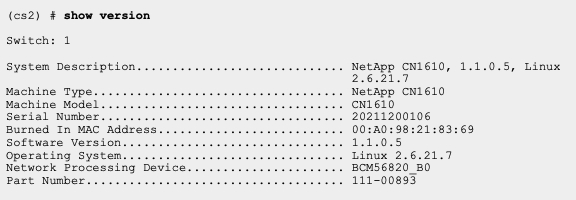
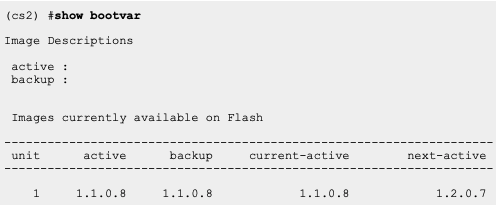
8. Since we are doing the upgrade on ClusterSwitch#2 First, Log into ClusterSwitch#2 and verify what version is running in active state, what is the backup version, and what version is giong to be next active.

(ClusterSwitch#2) #show bootvar
Image Descriptions
 active :
 backup :
 Images currently available on Flash
 ----  ----------  ----------  -----------------  -----------------
 unit      active      backup     current-active        next-active
 ----  ----------  ----------  -----------------  -----------------

    1     1.1.0.8     1.1.0.8            1.1.0.8            1.1.0.8


9. Copy active FASTPATH image to backup before making changes


10. Verify Current running Version on Switch#2.


11. Copy the Updated FASTPATH Image and stage it on SWitch#2.
(ClusterSwitch#2) #copy scp://username@servername //var/www/ftp/CN1610_1.2.0.7.stk active
Management access will be blocked for the duration of the transfer
Are you sure you want to start? (y/n) y

12.  Confirm the next active shows up the version you have just copied from step#11.


If RCF from Compatibility Matrix is not present, Follow 14-17, Else Move to Step 18

14. Find the Correct RCF file from Support site. For this exercise we are going with RCF_v1.2 that is compatible with Next-Active FASTPATH 1.2.0.7.
(ClusterSwitch2)#copy scp://username@servername //var/www/ftp/CN1610_CS_RCF_v1.2.txt nvram:script CN1610_CSRCF_v1.2.scr

15. Confirm Script is downloaded:


16. Apply the script to the Switch.


17. Verify the script has been applied to the switch, and then save the configuration.


Step 14- Step17 is required only if RCF version need to be updated

18. Reboot the ClusterSwitch#2 now. (1.2.0.7 as new FASTPATH has been uploaded, Newer RCF is uploaded by now. Reboot will make it active).


19. Verify the switch is running new version of FASTPATH Software on ClusterSwitch#2.


20. Now Log into ClusterSwitch#1 and Enable ISL Ports for Port-Channel


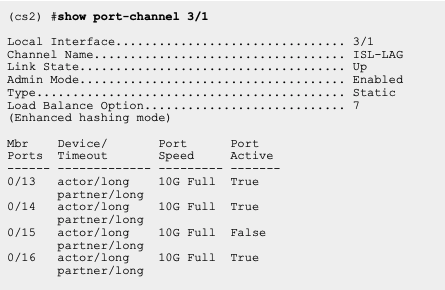
21. Verify ISL Ports are operational and Port channel is active from ClusterSwitch#2.


22. Log into Cluster and bring up the admin port of e0b which would now be connected to already upgraded ClusterSwitch#2. This can be done from node locally only i.e. logging into cluster lif prevents you from bringing up or down ports.


23. Verify that the cluster ports are healthy and UP by now.


24. Verify Cluster Interface are home and healthy.


25. Verify Cluster HA is healthy, cluster health is healthy.
Cluster1::*> Storage failover show


REPEAT STEP 3 THRU STEP 25 for ClusterSwitch#1 This time. Instead of Cluster lif clus2, this time it will be Clus1 and port migrate would be port e0b from step no. 3.


I have followed above instruction in doing multiple CN1610 upgrades.

I am sure you found it helpful.


You are welcome :)
Source: www.netapp.com


Netapp: What is an inode ?

Learn Storage, Backup, Virtualization,  and Cloud. AWS, GCP & AZURE.
......................................................................................................................................................................
Netapp Documentation Says-- An inode is a data structure containing information about files.
An inode is a data structure that defines a file, except for the filename which is stored in the directory entry. Note that a directory is just another file. The inode number is an integer unique to the volume upon which it is stored. Inodes point to blocks that make up a file, and inodes also contain the metadata of the file.
When a program refers to a file by name, the system looks up the filename in the directory entry file of the directory in which the file exists to get the proper inode. This gives the system the information it needs about the file to perform further operations.
Each inode contains the following information:
  • Volume where the inode resides
  • Locking information
  • Mode and type of file
  • Number of links to the file
  • Owner's user and group ids
  • Number of bytes in the file
  • Access and modification times
  • Time the inode itself was last modified
  • Addresses of the file's blocks on disk
  • Permission: UNIX bits or Windows Access Control List (ACLs)
  • Qtree ID
Data ONTAP allocates one inode per 32KB of data in a volume by default. This value can be increased to as high as 1 inode per 4KB of data via the maxfiles command.


You are Welcome :)
Source: www.netapp.com

Netapp: Maximum number of volumes snapshots, and flexclones

I am a seasonal IT professional with a background on VMware, Storage, Backup, Unix, and Project liaison experience. I have held positions working on technologies like Netapp, EMC, IBM, Cohesity storage and Backup supporting SAN and NAS Environment. I have held roles of IT administrator, engineer, team lead and project liaison. This blog is for Storage and Backup Professionals, and content are derived from vendor as well as my own experience.
............................................................................................................................................................................
I personally find it very helpful when I know the data if I have to compare some other storage products in terms of relative assessment.

Here are the maximum limits per volume as documented by Netapp.

Volume limits


1. Maximum file size: 16TB

2. Maximum flexclone volumes clone depth: 499 Characters.

3. Maximum volumes per cluster: 12000 **

4. Maximum volumes count: Model dependent. Refer: hwu.netapp.com

5. Maximum Qtrees per volume: 4995

6. Maximum Snapshot: 9.3 and earlier-: 255 &   9.4 and after-:1024

7. Maximum Clones per file or lun: 32767

8. Maximum total shared data per flexvol volume: 640TB (Array and Native), & and; 100TB (For Edge).


You are Welcome :)
Source: www.netapp.com

Cohesity: How to find running status and Cohesity agent version in multiple OS platform

Learn Storage, Backup, Virtualization,  and Cloud. AWS, GCP & AZURE.
............................................................................................................................................................................

How to find what cohesity version is running on supported operating system

1. Windows:
c:\Program Files\Cohesity>cohesity_windows_agent_service.exe --version
(Result will show what version release is installed as wellas last commit time)

2. Linux:
/home/cohesityagent/cohesityagent/software/crux/bin/linux_agent_exec --version

/etc/init.d/cohesity-agent status

3. RHEL 5:
/usr/local/cohesity/agent/cohesity_rhel5_linux_agent_exec --version

4. AIX:
/usr/local/cohesity/agent/aix_agent_exec  --version

5. Solaris:
/usr/local/cohesity/agent/solaris_agent_exec --version


You are Welcome :)

Netapp: Flexgroup volume vs. flex volume and inodes limit

Learn Storage, Backup, Virtualization,  and Cloud. AWS, GCP & AZURE.

............................................................................................................................................................................

Netapp: Flexgroup, Inodes limit, Volumes count- NFS


Flexgroup and Files Count:
NFSv3 in ONTAP uses 32-bit file IDs by default. 32-bit file IDs are limited to 2,147,483,647 maximum unsigned integers. With the two-billion inode limit in FlexVol, this value fits nicely into the architecture. 

However, because NetApp FlexGroup volumes can officially support up to 400 billion files in a single container (and theoretically, many more), the implementation of 64-bit file IDs was needed. 64-bit file IDs support up to 9,223,372,036,854,775,807 unsigned integers. The 64-bit file identifier option is off by default. 

This was by design, to make certain that legacy applications and operating systems that require 32-bit file identifiers were not unexpectedly affected by 34 NetApp ONTAP FlexGroup Volumes .

 ONTAP changes before administrators could properly evaluate their environments. Check with your application and OS vendor for their support for 64-bit file IDs before enabling them. Alternatively, create a test SVM and enable it to see how applications and clients react with 64-bit file IDs. Most modern applications and OSes can handle 64-bit file IDs without issue.

If a FlexGroup volume does not exceed two billion files, you can leave this value unchanged. However, to prevent any file ID conflicts, the inode maximum on the FlexGroup volume should also be increased to no more than 2,147,483,647.


You are Welcome :)
Source: www..netapp.com